Going on an outdoor adventure in your all-terrain wheelchair is a blast, and getting high-quality footage of the adventure makes it even better. It’s easy to assume that leaving the house with the intention to film some great clips alone will get you great results. However, it’s not easy to record high-quality videos using only your smartphone. Moreover, it is hard to feel confident you’re capturing the right thing, in the right way, at the right time when you’re in the moment on an adventure with a friend or family member. That is why we’ve created this guide to help you feel prepared for the next time you film an adventure with an off-road wheelchair rider!
1. Avoid Common Pitfalls
Easily overlooked, yet one of the single best things you can do to improve your videos is to record footage in landscape (horizontally). It can be enticing to hold your phone as you normally do, straight up and down, but holding your phone sideways when filming ensures the video file you’re creating does not have black bars on either side. You can always crop your video if you’d prefer to view it in a vertical fashion later on. By recording your videos with your phone held horizontally, you’ll record the highest possible quality with the most flexibility, so that when it comes time to edit your clips together, you’re not limited to only vertical videos!
Secondly, it is important to be cognizant of holding your phone or camera steady while filming. Riders often are on the move, and in order to keep up with the action, you may feel the need to walk or run alongside them. Filming quality shots will require you to minimize your own movement to avoid shaky footage. Therefore, it is critical that you strategically get ahead of your subject as much as possible so that you can easily pan the camera without additional shakiness, bumps, or additional movement of the camera. To avoid shaky footage, you can also consider buying a stabilizing device for your smartphone. If you’re the rider and don’t have a companion, try setting up your phone horizontally ahead of you, and then having it film while you roll toward it.
Lastly, smartphone cameras decrease in quality when zoom features are used in video recordings. A simple but effective way to ensure you record high-quality shots is to avoid using zooms. You may think you’re capturing something far away and improving your shot; however, it is best practice to physically move closer to your subject and film them without zoom whenever possible.
2. Choose the Best Settings for Video
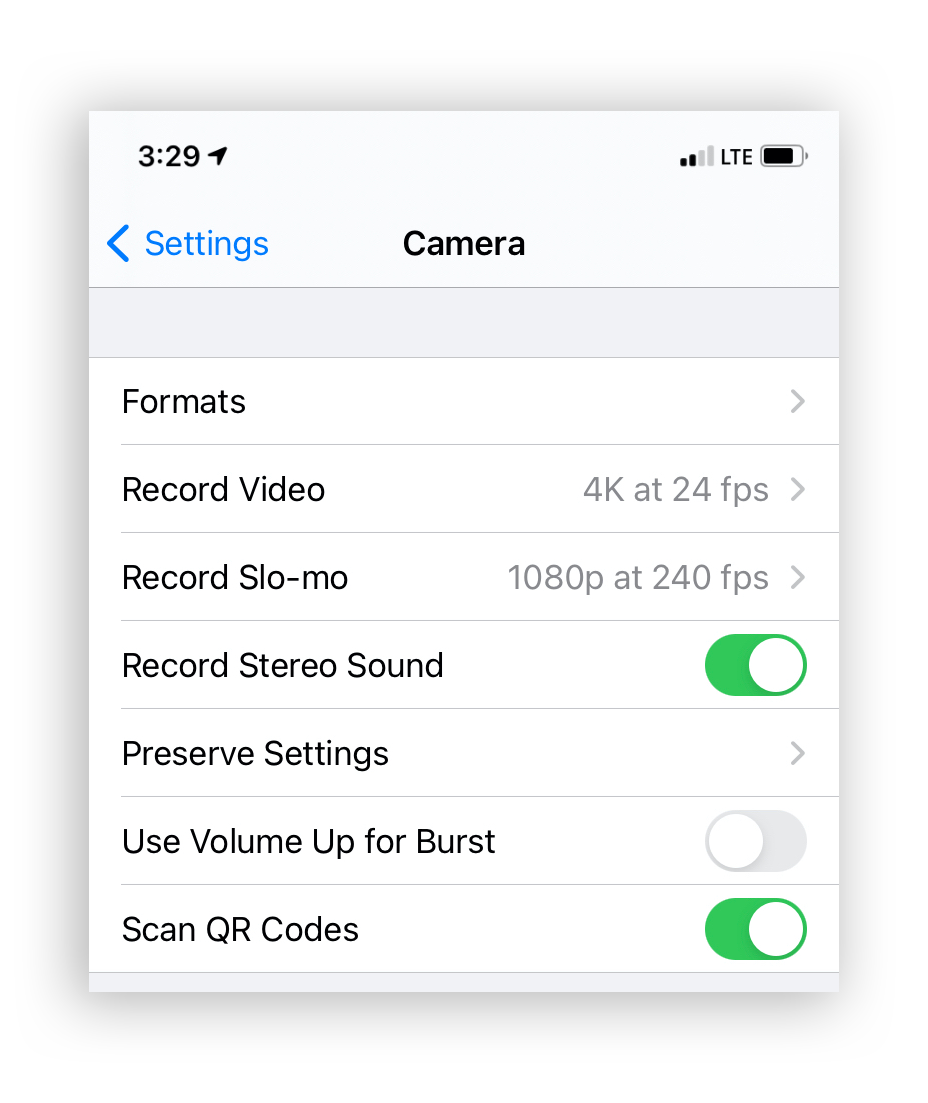
When it comes to settings, your smartphone likely has default settings that are already set up for a successful day of filming. However, it is always a good idea to double-check to ensure that you’re recording at the maximum quality. 4K resolution, or 3840 by 2160, are the dimensions in which you want your phone to record video. The frame rate settings should be set to 24. In order to change the settings on your iPhone, simply select Settings, scroll down to “camera,” and select “Record Video.” It is important to note: 4K video files will eat up a lot of storage on your phone quickly. Be mindful of your storage capacity on your phone; if it is a concern, recording videos in 1080p, commonly referred to as HD, will preserve quality while consuming less space on your phone. Here is a video on how to adjust the video camera quality on your iPhone.
3. Film Thoughtful Sequences
Let’s now discuss the importance of what to look for when filming and how to film sequences. As a general rule of thumb, if there is an exciting moment or part of the trip that is unique or special, always record it! However, it isn’t always entirely obvious what to film and when to film it, which is why it is useful to focus on filming sequences whenever possible.
A sequence is a group of multiple shots working together in a video to achieve the desired effect. Most often, a video is made up of several shot sequences, similar to how this article is made up of several paragraphs. Within each paragraph (or shot sequence), there are multiple sentences (or shots) that work together to create distinct sets. Challenge yourself to plan at least one sequence per trip. This way, you’ll be able to collect lots of footage while knowing that you still have the necessary shots to assemble a complete sequence during post-production.
One of the most simple and effective sequences for you to try in your next video is Wide, Medium, Close. The idea is that you take the time to film an entire action from three different angles. It may take some coordination with the rider but the principle is simple. First, record one shot that includes more of the environment where you can see everything that is happening. Next, change your vantage point and consider a different angle in which you get closer to the subject and can see more details. Lastly, film a close-up shot to highlight an interesting detail. For example, you could film a sequence of a rider leaving the house, riding over a bridge, or disassembling their all-terrain wheelchair after use by using a combination of Wide, Medium, and Close-Up shots. This can be a great exercise in creativity and will allow for many interesting options when editing later on!
4. Capture B-Roll
It’s always a good idea to capture as much additional footage that is relevant to your trip as possible. Any footage that is not considered primary footage is called B-Roll. B-roll is incredibly useful when splicing together your best clips to add additional context, further telling the story and allow for more flexibility when editing. For example, you could film shots of just trees, flowers, the beach, surroundings, the rider’s clothes, shoes, or pets. These additional shots will be details that will allow you to improve your overall video. It is easy to think you should only film the rider the whole time but that’s not the case! Remember to take some time to film other interesting aspects of the adventure.
5. Film Interviews
Lastly, recording interviews should be a staple of your filming routine. You can film the all-terrain wheelchair rider in their hiking chair or have them film themselves using the front-facing camera on a smartphone. Either way, the key is to document your adventures by filming small interview segments that will inject dialogue into your videos. Every great story has a beginning, middle, and end, so try to record a quick video with your rider of them in the beginning, middle, and end of their adventure. Be careful of wind when recording because it can interfere with audio; however, if you have the opportunity to record short interview segments to ask the rider questions it can add a great deal of quality to your videos!
6. Edit It All Together
Once you’ve captured all your footage, editing is the part of the process where you’ll make everything come to life. The main objective when editing is to understand what sort of footage you’ve captured and then select the clips that best tell your story. You don’t need expensive software that is difficult to use in order to create a high-quality video from your footage. Specifically, iMovie is a simple solution for those without a lot of experience who want to create an edited video.
Before you begin, make sure you’ve transferred the footage you’ve shot from your phone onto your computer. It is easy to do this using a USB cable connecting your phone to your computer, and from there, simply drag and drop the video files onto your computer. It is always a good idea to create a folder to store all of your individual video files in one place. Now you’ll have all your footage off of your phone and nicely organized on your computer to begin editing. Next, open iMovie and add your footage into the project by using the “Import Media” button, which will allow you to locate your footage folder, and select it. This is the process you will use to add any type of file to your editing project whether it be videos, images, or music. You can watch this video for a visual guide.
After you’ve imported your footage and music files, you will have all of the ingredients to begin editing. A great way to start editing is to simply drag and drop clips into your timeline and begin trimming the best sections. You can begin testing out which shots work best together through trial and error, or perhaps you have a vision for which shots will go well together best on the specific sequences you captured during filming. Keep building your sequence and previewing it until you are happy with the result. Once you would like to turn your Imovie project into an actual video file, simply select the export option in iMovie and select .MOV or .H264. Lastly, remember to save your iMovie project so that you can revisit your edit in the future!
The first step in the process is to ensure you have access to video-editing software such as iMovie or Adobe Premiere. iMovie is great because it is free on Mac computers and it is very user-friendly, whereas Adobe Premiere is better suited for professional use.
Want a professionally edited video of a ride in a GRIT Freedom Chair but don’t have the time or experience?
Just send us your raw footage to info@gogrit.us and we will edit it for you!